

This post is a continuation of the previous three posts, so if you haven’t read them, what you read here may be confusing. So read this post first, then this post, and this post. I have uploaded the project file to Github according to the process we have had so far, you can download it from this link or open it with Github desktop software, which is better because you can get the next updates easily. The name of the file is ChangeSpeedUsingSlider, which is located in the Scenes folder.
There was a limitation in the third post where I explained the use of array and loop. It was that to control the color, speed, and rotating direction of the fan model, you had to use the value fields in the Unity UI. Now, in this post, you will take these controls into the game environment and it will look like you output what you made and someone is going to play.
In this project, a new thing that is added is the use of sliders. To simplify the implementation process, I prepared the sliders and adjusted their position in the frame of the main camera. The sliders are located in the Hierarchy tab in the canvas named SpeedSlider, ColorRed, ColorGreen, and ColorBlue.
1- Create a script file and give it a desired name, which I named SpeedControlSlider
2- Double click on it to open Visual Studio
3- First, add the following variables
using System.Collections;
using System.Collections.Generic;
using UnityEngine;

public class SpeedControlSlider : MonoBehaviour
{
    public float speedControl = 1.0f;
    public float red;
    public float green;
    public float blue;
    Renderer myFan;
You will use the first variable to control the rotation speed, which its access is public. I explained about the types of access in previous posts. The reason that this variable is of decimal or float type is because later you want to use it inside the Rotate method and this method only accepts decimal numbers as parameters.
Lines 8, 9 and 10 are the variables that control red, green and blue colors. Because their value is set between zero and one, they must be decimal. For example, a value of zero for red, zero for green, but one for blue produces a full blue color, or a value of zero for blue, a value of 0.5 for green and red produces a yellow color.
I explained the variable of line 11 in the first post and you will use it to change the color of the material connected to the fan model.
4- Add the following codes after the Start and Update methods
void Start()
{

}

void Update()
{

}

public void speedSlider(float sliderSpeed)
{
    speedControl = sliderSpeed;
}

public void redSlider(float newRed)
{
    red = newRed;
    UpdateColor();
}

public void greenSlider(float newGreen)
{
    green = newGreen;
    UpdateColor();
}

public void blueSlider(float newBlue)
{
    blue = newBlue;
    UpdateColor();
}

public void UpdateColor()
{
    myFan.material.color = new Color(red, green, blue);
}
In the code above, I have defined five new methods, the first four of which are going to be connected to my sliders. The fifth method just uses the amount received from the sliders as a new color to change the material color of the fan model. If you pay attention, something has been added in the parentheses of the first to the fourth method, which was not in the methods I used in the previous posts, of course, I explained it in this link. These, all four of which are decimal numbers, are called method parameters. Their job is to enter a value into the method, for example, here the parameter “float sliderSpeed” in the first method takes the value that you set in the first slider and assigns it to the speedControl variable that you defined first to control the speed and rotating direction. The other three, such as “float newRed”, take the value of the red slider between zero and one and assign it to the red variable that you defined first to determine the amount of red, and the rest in the same way.
One question is why the UpdateColor method is included in the first four methods. The reason is that when you change the slider by moving it left and right, the color value of the material changes in real time. It means to update the color.
5- Add the following lines to the Start and Update methods
    void Start()
    {
        myFan = GetComponent<Renderer>();
        myFan.material.color = new Color(red, green, blue);
    }

    void Update()
    {
        transform.Rotate(0f, 0f, speedControl * Time.deltaTime);
    }
In the first and second posts, I explained line 14, which can be summarized as referring to things in the renderer component, one of which is the material. Now which component? The model component to which the script is attached. In the next line, we say that in the renderer component that we mentioned in the previous line, go and change its material color with this new color. This new color is nothing but the default numbers inside the sliders, which are zero. Why did we put these two lines inside the Start method? In order to set the color of the model at the start of the game with the default values of the sliders, if not, you will see that the color of the model at the start of the game is white and as soon as you change a slider, the color of the model changes suddenly. The three values inside must be decimal numbers, instead of them, we put the float variables that we defined at the beginning, which themselves get their values from the sliders. How? With the methods we defined for each.
Take a look at the declaration of the Color method below. The first three are for red, green, and blue colors, and the last one is related to alpha, which controls the transparency of the color.
public Color(float r, float g, float b, float a); I also explained the code line inside the Update method in the previous post.
6- Save the file and return to the Unity UI
7- Select the Fan model and put the script under the last component in the Inspector tab
8- The last step is to connect each slider to its own method. Select the first slider named SpeedSlider and in the Inspector tab click on the + sign in the “On Value Changed” section and drop the fan model from the Hierarchy tab in the section that says “None (Object)”. Now, like the image below, connect the slider to its corresponding method.
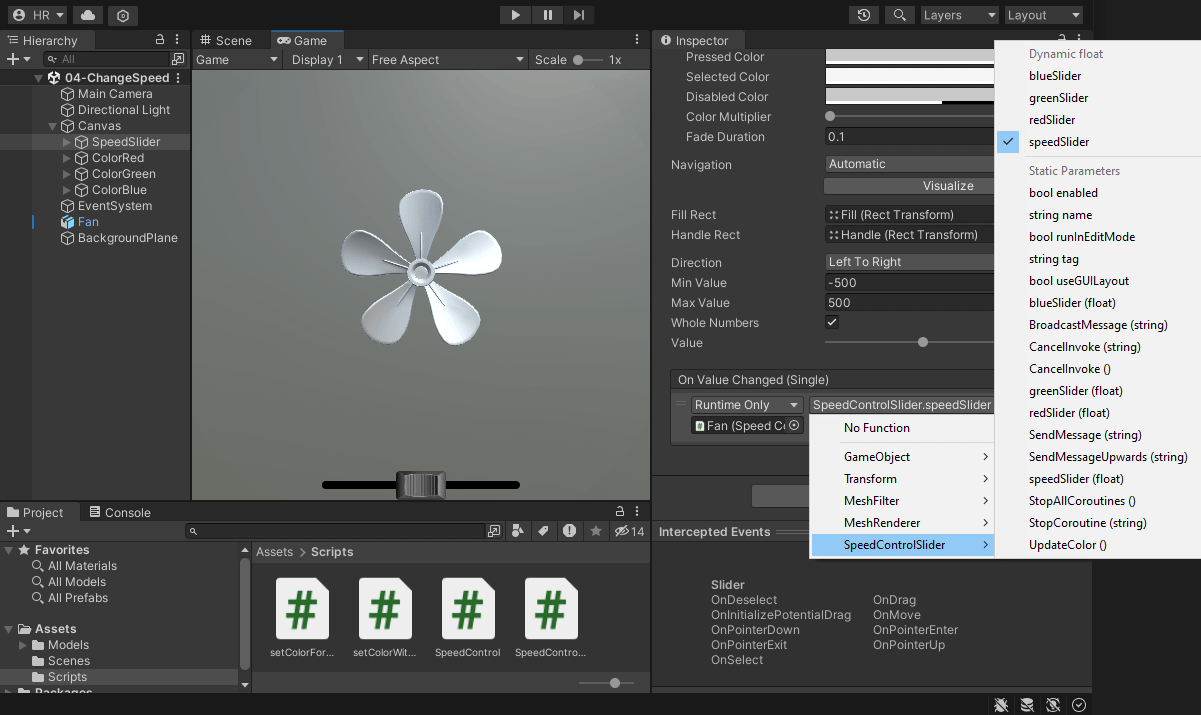
9- Repeat this for the rest of the sliders
10- Now if you press the Play button, you will see that the rotation speed slider does not work properly. The reason is that the default minimum and maximum values for sliders are between zero and one. So select the SpeedSlider slider and set the Min Value and Max Value to -500 and 500 respectively in the Inspector tab. With the minimum negative value, you can change the rotation direction.