
After a long time, I got an opportunity to add some blog posts to my website that would be both useful and related to the topic of virtual reality. I thought that it might be a good idea to deal with C# as the scripting language in Unity game engine. Therefore, in this post and subsequent posts, I will try to explain it by doing simple projects.
If I want to start with a short introduction, I must say that the development of C# by Microsoft started in 2002 and continues until now. It has been used as the main scripting language in the Unity since 2005, and until now, after about 20 years, many large projects have been implemented through it, and from where a large part of virtual and augmented reality projects are made with Unity, the importance of learning it for people active in this field is very colorful. Another reason may be that content development for VR and AR is still at the beginning of its journey and many features are not yet available to the user without the need for coding. Although this situation will change very soon, programming is still following you like a ghost, now it is better to take a look at it. It may seem a bit complicated at first, but over time, with practice and implementation of small projects, you will realize that you can cope with it.
In this post, as the title suggests, I am going to use a few lines of simple code to change the color of a mug, for example, to red. For this reason, I have prepared a project that you can download from GitHub through this link, which is the same project you see here. I will update this project as I add more content, so it is better to have the GitHub desktop software on your PC so that you can easily get the changes. You can also continue without downloading the project and make a cube instead of a mug.
In the following, it might be good to write the things you are going to do in order:
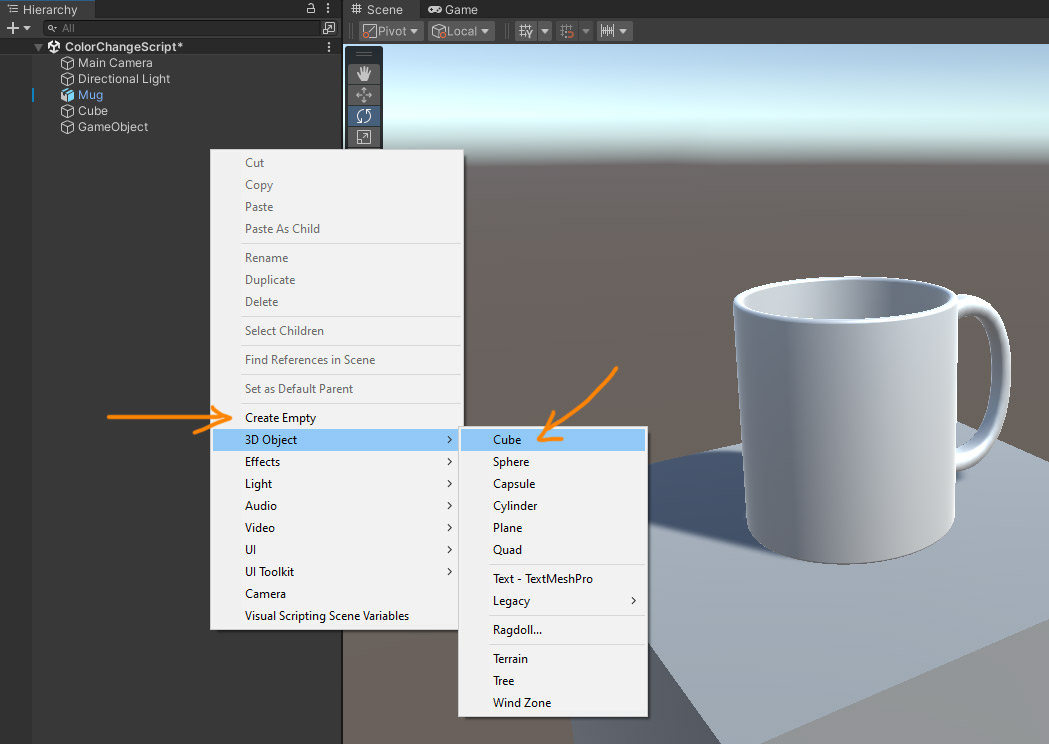
1- Make a cube and name it whatever you like. For me, I named Mug
2- Create a GameObject by clicking on Create Empty in the Hierarchy tab, both of these steps are shown in the image below
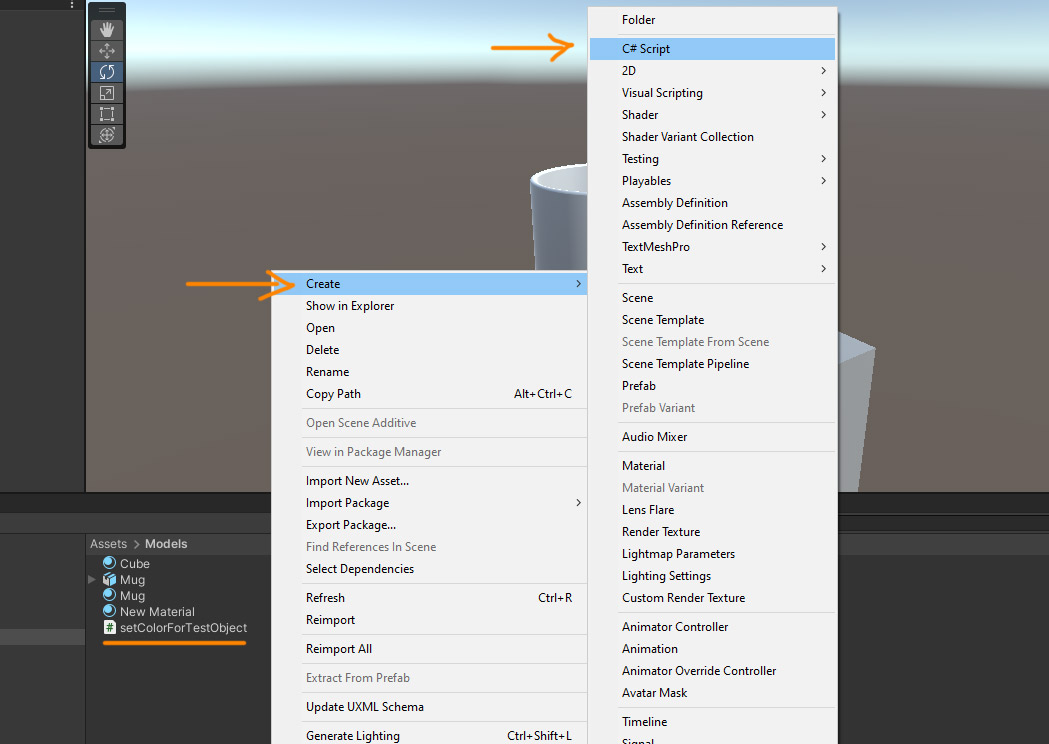
3- In the Assets section, create a C# script and define a recognizable name for it. I chose setColorForTestObject, this is also shown in the image below. Maybe telling these steps in this way is not interesting for those who are familiar or working with Unity, but since this is the first post, I want it to be so that everyone can follow it you know, accessible to wider readers.
4- Now by double-clicking on it, the Visual Studio Community software will open and the following codes will be seen inside. The name that you specified for the script file in Unity should be placed in the fifth line after “public class”, and basically that is the only thing that you determined, the rest of those words are added by default.
using System.Collections;
using System.Collections.Generic;
using UnityEngine;

public class setColorForTestObject : MonoBehaviour
{
    // Start is called before the first frame update
    void Start()
    {

    }

    // Update is called once per frame
    void Update()
    {

    }
}
A short explanation is that the first three lines that start with “using” are important, but I will explain them in another post. But in the fifth line that starts with “public class”, our script has defined a class. What is the class now? Its name seems important, so it must be important. Let me give you an example, let’s say you have a piece of land and now you decide to build a house on it, so you go to your engineer friend and ask him to draw a plan for you, and he does the same. To find your plan easily among other plans, he or she writes your name on the plan. Now, when you check the plan, you will see how many rooms, kitchens, etc. are inside, how much of the land is built and how much is the yard. At first, it seems good to you, but then you decide to make some changes, for example, reduce the number of rooms and add to the space of the living room, and the engineer will also do it because a good engineer is our story. In my example, the role of the building plan is similar to the class in the code below, which specifies how to implement things and has a name to distinguish it from other classes, like a building plan, you can make any changes you want. For its range to be clear, like a piece of land, it has a curly bracket symbol at the first and last, like the example below.
using System.Collections;
using System.Collections.Generic;
using UnityEngine;

public class setColorForTestObject : MonoBehaviour
{
    // Start is called before the first frame update
    void Start()
    {

    }

    // Update is called once per frame
    void Update()
    {

    }
}
The word “public” specifies the type of access to the class, that is, it controls the access of other codes and the Unity user interface to the class. Now that access to the class is public, it means that everyone is allowed to access this class. Apart from the public access type, there are five other types of access, which are called access modifiers, which I will explain in another post.
I should also mention the end of the fifth line, MonoBehaviour. In fact, this is a class that has a very important application. If we go back to the example above and suppose our engineer has several special stamps, he or she puts one of the stamps on them according to the type and application of the final house plan, for example, one plan is for commercial use, another is for residential use, and some are both. Here MonoBehaviour says that our class called setColorForTestObject is a component. The simple meaning of this being a component is that it allows your class to stick to other components in the Unity UI, for example, if you take your own script file in the Unity UI, drag and drop it under a cube in the Inspector tab, it will be added to the end of it. In addition, the two lines 8 and 14 that have the words “void Start” and “void Update” have been added to our class by the same MonoBehaviour class.
Line 7 is basically an explanation about what is going to come next, and it is called a comment. In general, for any line that starts with two // signs, the program does not execute that line and skips it. This sign / is also called forward slash and it is important that there be two in a row. If you don’t want a line of code to be executed, you can put two of these in front of the line.
using System.Collections;
using System.Collections.Generic;
using UnityEngine;

public class setColorForTestObject : MonoBehaviour
{
    // Start is called before the first frame update
    void Start()
    {

    }

    // Update is called once per frame
    void Update()
    {

    }
}
The eighth line starts with the word “void”, which simply means that what is going to be done here will be done in the end, but it is not going to return a value. For example, consider an old Iranian tradition in which a person cooks a dish called Aush and sends it to his or her neighbor or family in a bowl. That neighbor or relative would not send the bowl back after eating or would put something like an apple in the bowl as a sign of thanks to that person and send it back. Now void has the role of that relative or a neighbor who is not supposed to send anything back.
Now, about the word “Start”, which has two open and closed parentheses after it, which we said where it comes from, its job is to set or determine a series of things before the game starts. This is the place where you are going to put your code because your mug is supposed to be red when the game is launched. I should also say about the “Update”, although you have nothing to do with the “Update” at this time, its job is to run the code that is placed inside the game continuously, which you will see later in another example. Both of these are called “Method”, which I will explained here.
Let’s go back to the numbers
5- Delete all lines 13 to 17 because you have nothing to do with Update at this stage
6- Click in front of the curly bracket of line 6, then press Enter until line 7 appears, and add the following code:
using System.Collections;
using System.Collections.Generic;
using UnityEngine;

public class setColorForTestObject : MonoBehaviour
{
    public GameObject myTestObject;
    // Start is called before the first frame update
    void Start()
    {

    }

}
In this line of code, you create a variable called “myTestObject” with a public access modifier that I explained above. GameObject is also a class that allows your variable to have access to some things related to the mug model that you can change later.
7- Save this and return to the Unity
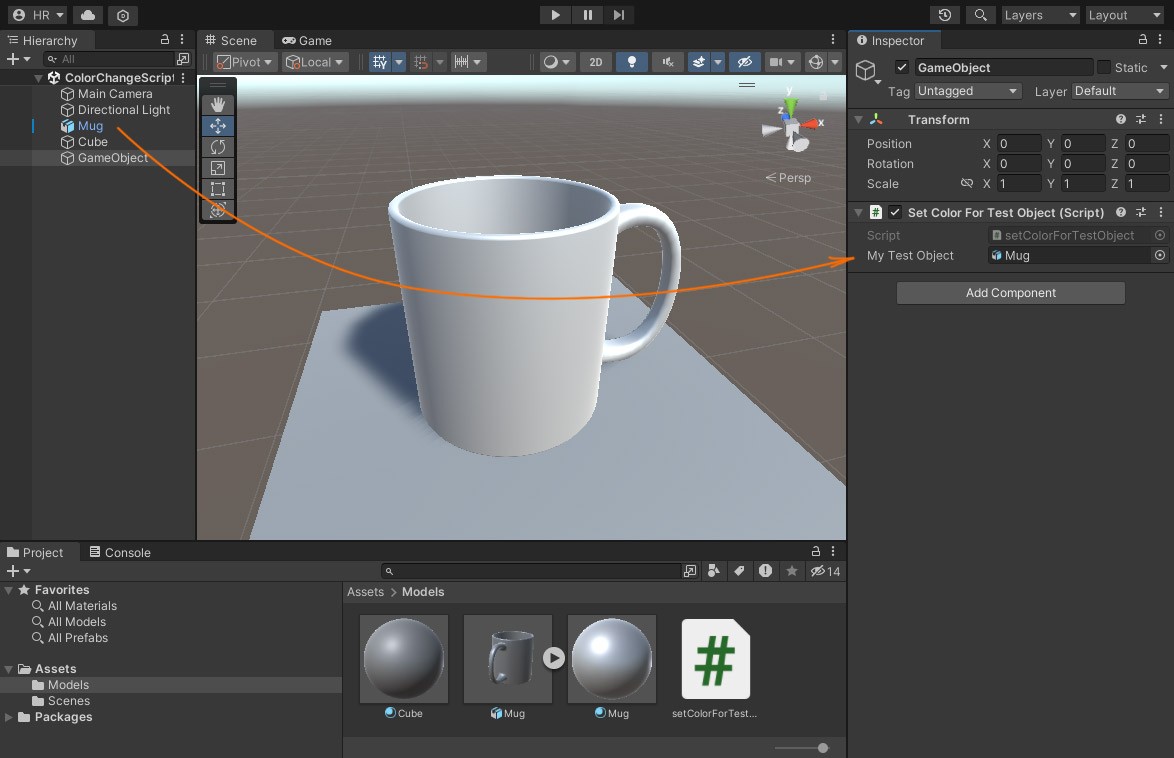
8- First, select the GameObject you created earlier from the Hierarchy tab and then take the script file from the Assets tab, drag and drop it in the Inspector tab, now your script will be added like a component under Transform, and the variable you defined because it is of public type is now available here and you can connect the mug model to it.
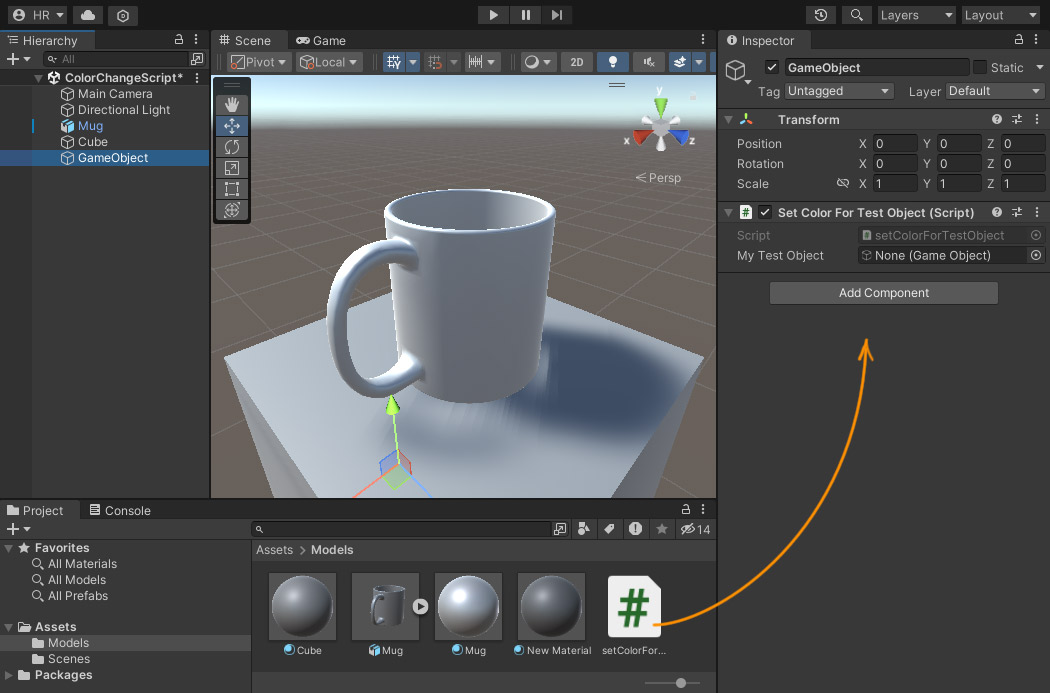
9- Take the mug model from the Hierarchy tab, drag and drop it in the My Test Object field, which is empty, that is, the place where “None (Game Object)” is written. From here on, since the script is connected to the mug model, you can make changes to the model.
10- Return to Visual Studio and add the following two lines to the “Start” method exactly like the example below:
using System.Collections;
using System.Collections.Generic;
using UnityEngine;
public class SetColorForTestObject : MonoBehaviour
{
public GameObject myTestObject;
// Start is called before the first frame update
void Start()
{
var myPubRenderer = myTestObject.GetComponent<Renderer>();
myPubRenderer.material.SetColor("_Color", Color.red);
}
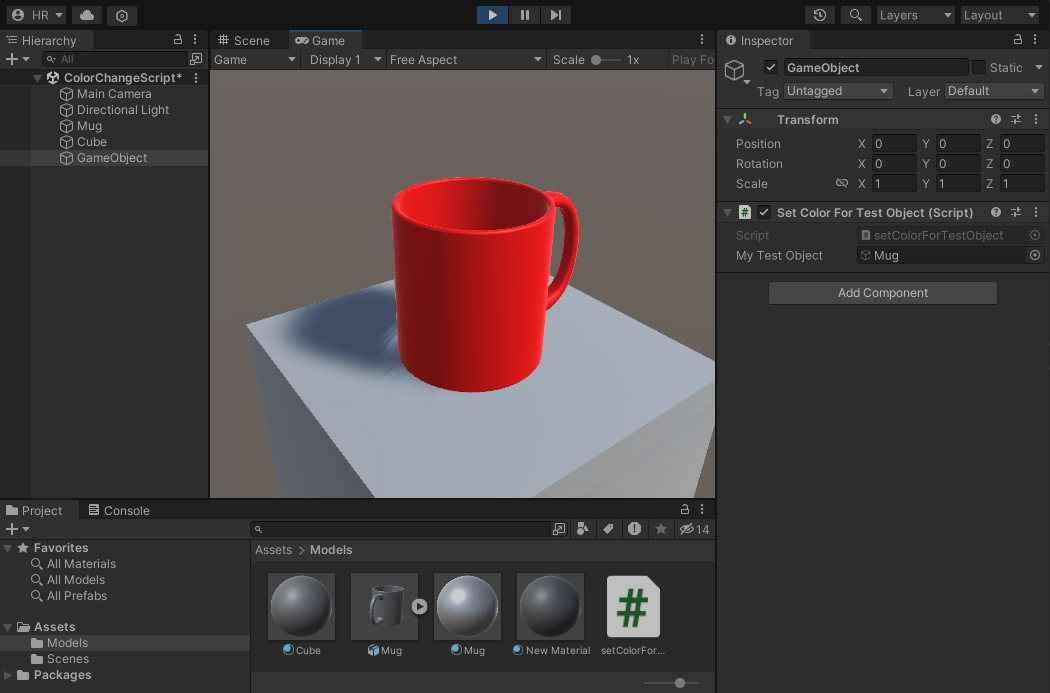
}11- Save the changes then go back to Unity and press the play button. After execution, you should see the mug in red, if not, review the steps once to see which one you did not complete.
An explanation about these two lines. In the first line, which starts with “var” and then a desired name, you basically define a local variable, the good thing is that you don’t need to say what its type is and the compiler takes care of it. Now you are going to assign something to this variable that comes after equal sign. Everything that comes after equal sign here is like an address that allows you to access a place because you have the address.
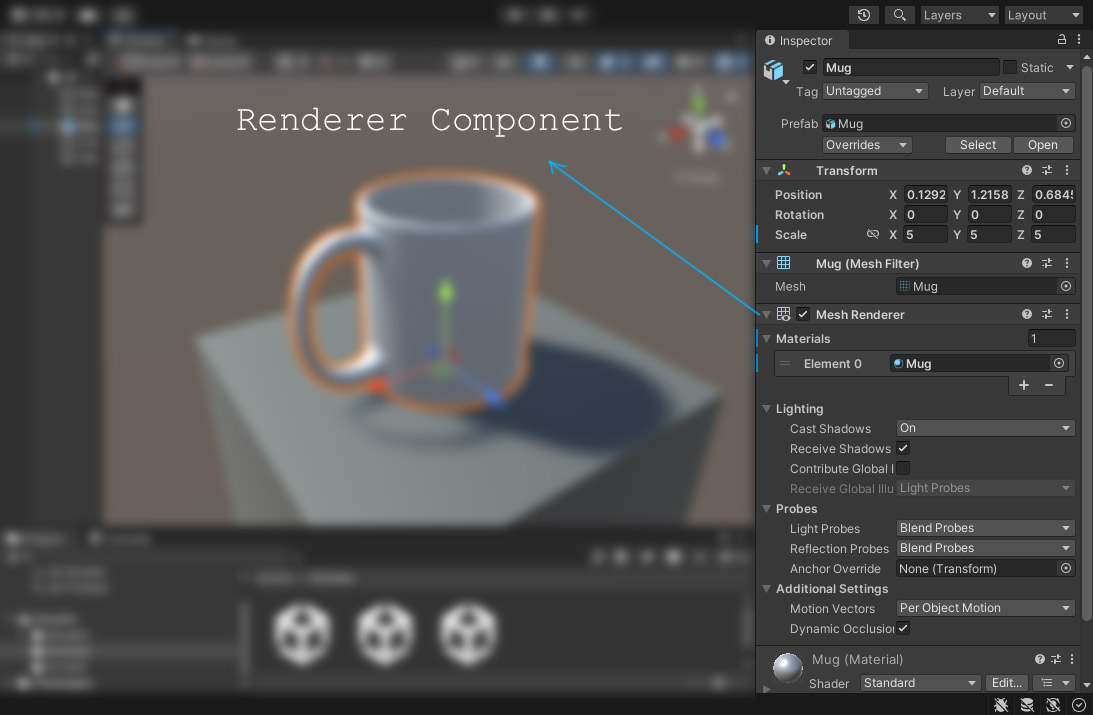
var myPubRenderer = myTestObject.GetComponent<Renderer>();Our myTestObject, which is attached to the mug model, and now GetComponent, which is a method (read the method description here), allows you to access the renderer component. If you look at this component in Unity, you will see that it has a lot of control over the mug, such as material and shadow control. Well, so far you have access to the mug material.
Now, in the next line, you can change the material of the mug with “SetColor”, which is a method, with the access I assigned to the myPubRenderer variable. In this method, the main color of the material is controlled with “_Color” and its value is done with “Color”, which changes to red here. I should also say that there may be other colors in a material, such as the color of the Emission part. If you want to change it, enter “_EmissionColor” instead of “_Color” in this line.
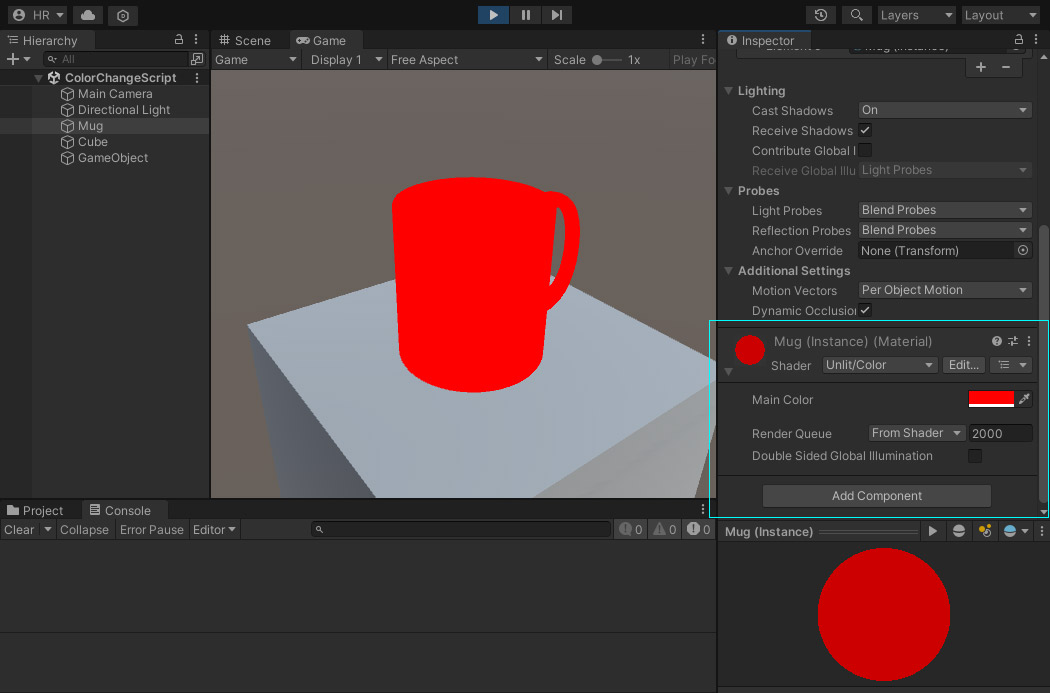
myPubRenderer.material.SetColor("_Color", Color.red);In addition, for this code, it does not matter what the material is, and if you change the material and that material has the main color, this code will still work. For example, if I change the standard material in the “Shader” section to Unlit > Color, because this material also has the main color, the color will be changed.
Finally, I would like to add that the question may arise that it is not possible to directly put the script under the mug model without connecting the mug model to a variable in the GameObject. The answer is yes, with the code lines below. But consider that you will use the above way more in the future.
using System.Collections;
using System.Collections.Generic;
using UnityEngine;

public class SetColorForTestObject : MonoBehaviour
{
    Renderer myTestObject;

    // Start is called before the first frame update
    void Start()
    {
        myTestObject = GetComponent<Renderer>();
        myTestObject.material.color = Color.red;
    }
}