
I am interested in 3D graphics not only as a job but also as a hobby and often use my spare time for 3D modeling and related work. I believe that selecting an object to create in 3D and then following the rest of the steps such as creating textures, setting lighting, and rendering, is the best use of my spare time. Once a model is complete, I try to choose the next modeling subject during the searches I usually have on the Internet. The Ricoh action camera was chosen in this same way.
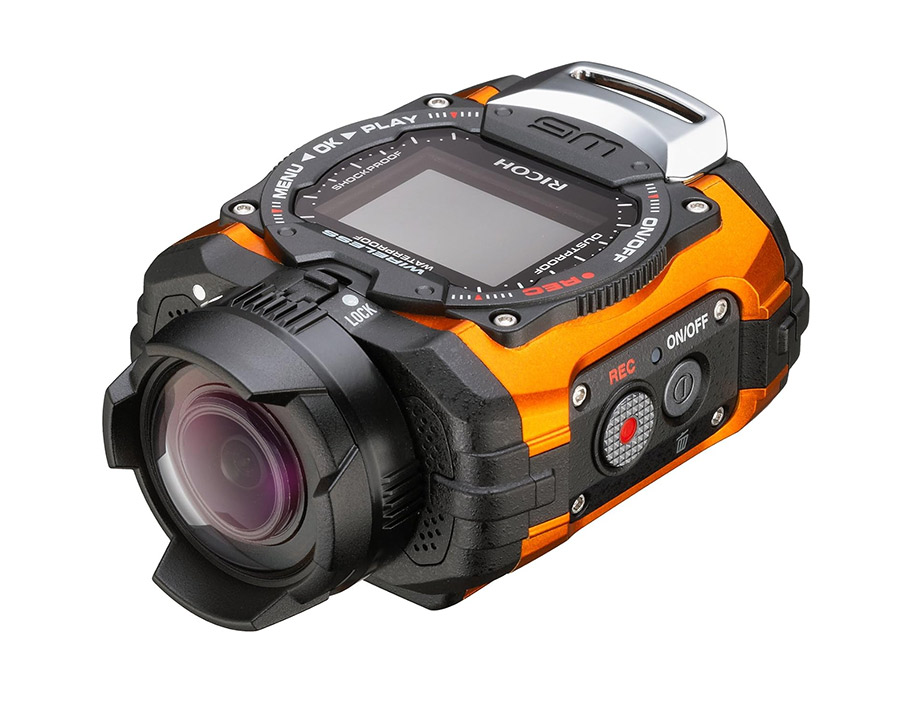
I usually use Google, Art Station, and Pinterest to find image references. However, when searching for images and pictures of this particular camera, I could only find a few photos on Google. Having various pictures from different angles and close-up shots of details can be very helpful in getting a better understanding of the subject’s surfaces, curves, and shapes. Eventually, I found the sales page for the camera on Amazon, which had high-quality pictures that I used as orthographic reference pictures in Fusion 360.
Before I start creating a model, I usually spend a few minutes observing the images and pictures I have collected of the subject. This helps me to understand the subject’s surfaces and curves better. Even after starting the model, sometimes I pause and refer to the pictures to evaluate the best way to model a certain piece. You can follow all the steps from setting up the orthographic reference pictures to adding the final details by watching the videos below.
The process of creating the model in Fusion 360 took approximately twenty hours and was completed within five days. If you watch the videos, you will notice that the usage of certain tools is constantly repeated and no complicated techniques were used while creating the model so the modeling process is easy to follow and understand.

I completed the modeling steps and decided on the number of divisions for each piece in Fusion 360. I then exported the pieces in obj format and imported them into Maya. It is important to choose the appropriate number of divisions for each piece based on its size and intended use. For example, if a piece is small compared to the whole model, it can be exported with low-density divisions. But if the same piece will be rendered in a close shot, it should have a higher number of divisions so it depends on the situation. In the screenshot below, some pieces may appear to have too many divisions, but I chose to export them in full detail to ensure they would look good from different angles.

To set the UV or texturing coordinates, I took a different approach from my previous projects. I combined the UV of all the pieces that were supposed to have a single material. To ensure that the final texture had a consistent level of detail, I assigned a texture of 1k, 2k, or 4k to each piece in Substance 3D Painter, based on the amount of surface area it had. Although this method has its limitations, it proved effective for this particular model. The screenshot below shows the result of this method.

In Substance 3D Painter, by changing the settings of a few Smart Materials, I assigned materials quickly. However, it took a while to create the signs and find the original fonts. I could have used similar fonts, but eventually, I managed to locate the original font that I used for the texts of the top piece in the model.

I used Maya along with the Arnold rendering engine to create the lighting and render for this model. To set lighting, I used a dome light along with three disk lights placed around it. Below, you can observe the result of the lighting on the model without any textures applied.


I did not make any special settings for rendering and the changed values are shown in the screenshot below. I saved all the rendered images in png format and filled the background with a simple gray color in Photoshop. Initially, I considered taking the rendered images in exr format and adjusting the colors and light intensities in Photoshop. However, I concluded that the output images of the rendering are good enough and do not need to be changed.

The final rendered images are displayed below. Perhaps later, I will assign a texture on the camera screen to make it look powered on or render a few close shots.


In the end, I thought it might be a good idea to create a 360-degree video of this model. You can see the result below.
Click here to see this work on the ArtStation website.
I’m pleased to share that this blog post has been published on the Autodesk Community Blog. You can read it here.